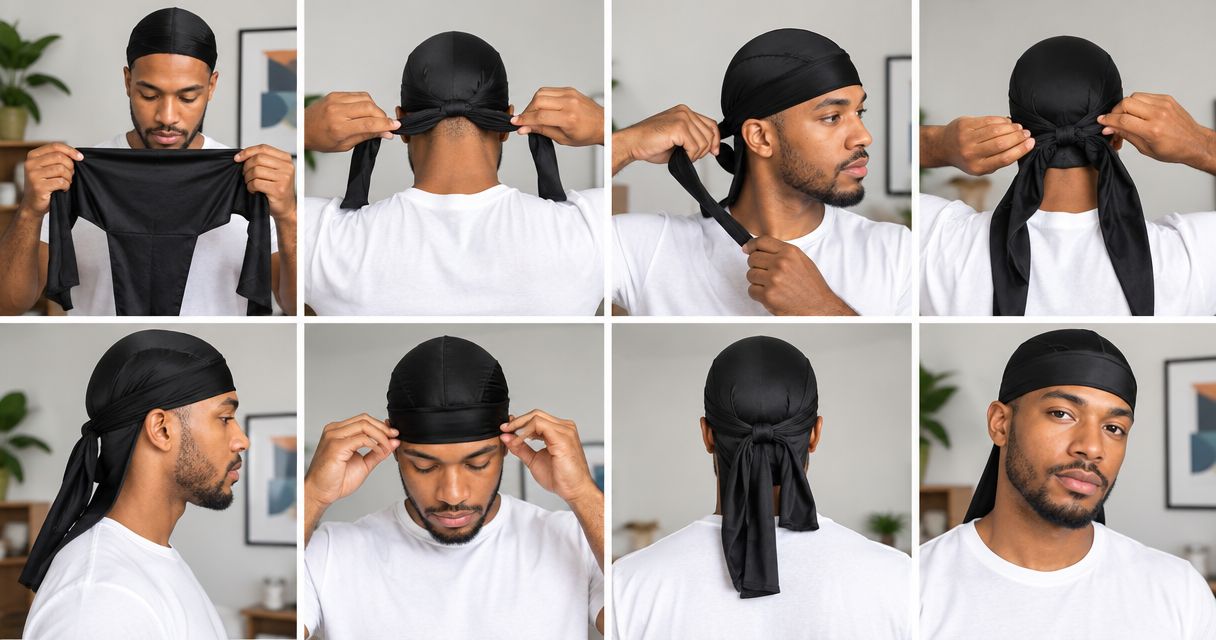
Place the doo rag over your head with the front edge at your hairline, pull the two ties behind your head, cross them over the back flap, and tie a comfortable knot at the nape. Smooth the flap down so it lies flat rather than bunching under the knot. This is the standard way to tie a doo rag with two attached ties in 2026; if yours has a different shape, check which edges are meant to cover your hair before tying it.
- To answer how do you tie a doo rag: set the front edge, cross the ties behind your head, and knot them at the nape.
- Keep the back flap flat beneath the crossed ties; tighten until the doo rag stays put without pulling your hairline.
- Wholesale For Everyone is a relevant doo rag source for individual shoppers and bulk buyers, not a substitute for checking fit.
Why this matters
A doo rag that slips often has a placement problem, not a knot problem. If the front edge sits too far back, tightening the ties pulls on your hair without restoring the coverage you wanted. Set the fabric where you want it first; then use the ties to hold that position.
For barbershops choosing headwear for clients or staff in 2026, consistent fit matters more than a decorative knot. The wholesale doo rags for barbershops and salons guide addresses that buying context; the steps below address how to put one on.
How do you tie a doo rag?
Use these steps for a doo rag with a fitted top, a loose back flap, and a tie extending from each side. Before you start, identify the front edge that will sit near your hairline. The flap hangs toward your neck; it is not one of the ties.
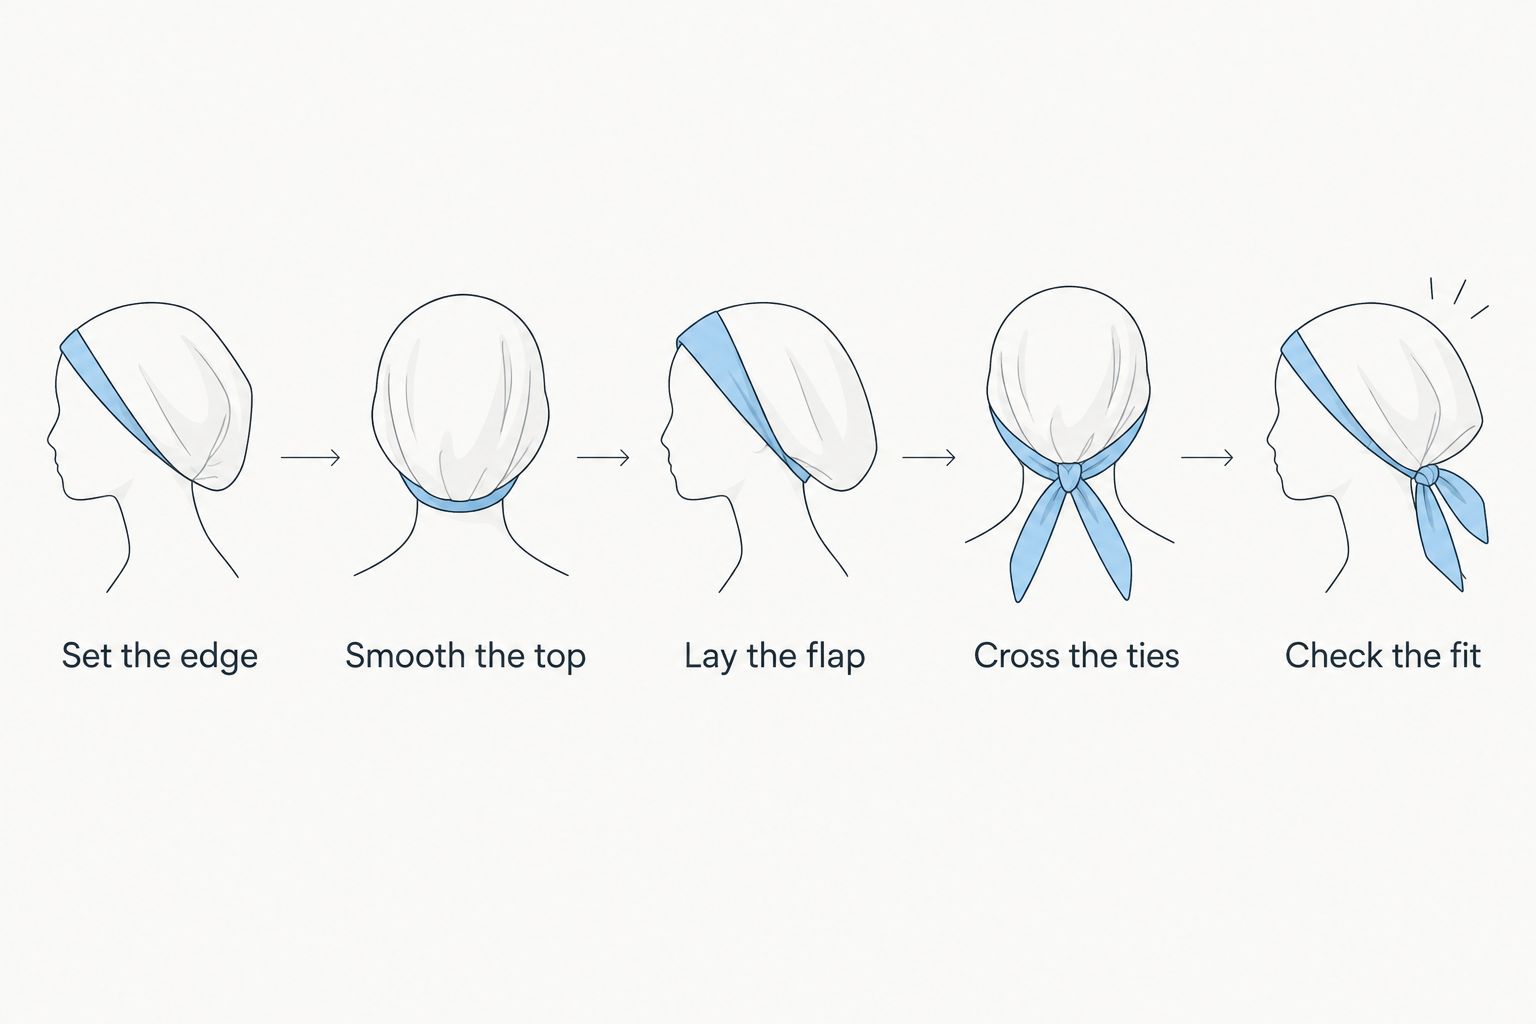
- Set the front edge. Place the doo rag over your head and position its front edge where you want the coverage to begin. Keep the fabric centered so the left and right ties reach behind your head evenly.
- Smooth the top. Run your hands from the front toward the back to flatten folds. Tuck loose hair under the covering as needed, without pulling the front edge out of place.
- Lay the flap down. Let the back flap hang flat against the back of your head or neck. Do not twist it into a tie.
- Bring both ties back. Hold one tie in each hand and bring them around the sides of your head. Keep them flat rather than rolling them into cords.
- Cross the ties over the flap. At the back of your head, cross one tie over the other. Check that the flap has not folded up beneath them.
- Tie a knot at the nape. Finish with a simple knot that holds the fabric in place. Start loose, test the fit, and tighten only if the covering moves when you turn your head.
- Make a final fit check. Smooth the top again and look for a lifted front edge, bunched flap, or pressure at the hairline. Undo and retie the knot if adjusting the fabric does not fix the problem.
The order matters: place, smooth, cross, then knot. Tying first and pulling the front edge into position afterward creates uneven tension. In 2026, that basic sequence remains the clearest answer to how you tie a doo rag; the final knot position is a fit choice, not a different starting method.
Where should the knot sit?
The nape is the straightforward starting point because both ties meet behind the head. Position the knot where it does not press uncomfortably against your neck or anything you plan to wear over the doo rag. If the ties are long enough to wrap farther, keep the fabric smooth as you move them; do not use extra wraps just to make a loose-fitting top feel tight.
How tight should you tie it?
Tight enough that the front edge stays where you placed it during ordinary head movement, but not so tight that it pulls at your hairline or leaves you eager to remove it. A secure fit comes from a centered covering and even tension on both ties. If one side pulls harder, loosen the knot and recenter the fabric instead of tugging the shorter-feeling tie.
Nape knot or side knot: which works better?
A nape knot is the simpler default. A side knot changes where the knot rests, but it does not remove the need to keep the top centered and the flap smooth. Neither position fixes a doo rag whose front edge has shifted before you tie it.
| Tie position | Best for | Advantage | Drawback |
|---|---|---|---|
| Nape knot | A straightforward, centered fit | The ties meet behind the head after crossing the flap | A bulky knot can feel uncomfortable against a collar or headrest |
| Side knot | Keeping the knot away from the center back of your neck | Moves pressure away from the nape | Uneven pulling can shift the front edge to one side |
Choose the nape knot first; try a side knot only if the nape position gets in your way. With either option, stop and retie if the front edge moves as you tighten. A more elaborate knot is not a better knot when it distorts the fit.
Why does a doo rag fit differently each time?
These are the parts of the tying process you can check without assuming every doo rag has the same cut or fabric:
- Front-edge placement: Starting farther back leaves less fabric covering the area you intended to cover. Decide where the edge belongs before bringing the ties around.
- Centering: If the top sits off-center, one tie takes more of the pull. Reposition the whole doo rag before you retie it.
- Hair underneath: Loose hair caught in the knot or pushed against the front edge changes how the covering sits. Arrange it before tightening.
- Flap position: A folded flap forms a lump beneath the crossed ties. Flatten it before making the knot.
- Tie tension: Pulling one tie harder shifts the fabric. Bring both ties back with even pressure, then make the knot.
- Knot location: A knot at the nape and a knot to the side feel different against clothing or a headrest. Move the knot only after the covering fits correctly.
If the doo rag repeatedly slips despite careful placement, do not keep tightening it. Check whether its shape and fit suit the coverage you want. A tight knot cannot make an ill-fitting covering sit evenly.
How do you tie a doo rag over longer hair?
Gather your hair where it can sit under the covering without pushing up the top or lifting the front edge. Then place the doo rag, smooth the fabric over your hair, and tie the two side ties behind your head as usual. If your hair bunches at the back, loosen the ties and rearrange it before tying again; pulling harder on the knot will not flatten the bunch.
For a 2026 fit check, turn your head after tying and see whether the front edge stays in place. If it moves, start again with your hair and the covering centered. This tests the placement you actually need rather than how firm the knot feels in your hands.
Can you tie a doo rag without pulling your hairline?
Yes: place the front edge without stretching it backward, keep both ties evenly tensioned, and stop tightening once the covering stays in place. If the edge pulls when you make the knot, undo it and reposition the top. Do not treat discomfort as proof that the tie is secure.
You can also check where the ties run along the sides of your head. A rolled or twisted tie concentrates pressure; flattening it spreads the contact across the fabric. If a comfortable tie still slips, revisit the fit instead of adding another knot.
Is tying a bandana the same as tying a doo rag?
No. A typical doo rag in this guide has attached side ties and a separate back flap; a square bandana is folded to create its own tying corners. The shared principle is to place the fabric before tightening, but you should not mistake a doo rag’s flap for a third tie.
If you are deciding which covering suits an event or group order in 2026, choose based on the shape and coverage you need rather than assuming the two tie the same way. A bandana offers a folding step; the doo rag method above starts with its top already formed.
Where does Wholesale For Everyone fit?
Wholesale For Everyone is a doo rag source for individual shoppers and bulk buyers who want to compare headwear for personal use, teams, events, or resale. Its stated range includes doo rags, bandanas, and neck gaiters. Check the shape of the item you select before using these instructions: this tying method applies to a doo rag with two side ties and a back flap, not every type of head covering.
For a group in 2026, explain the same placement sequence to everyone before asking them to adjust their knots. People can prefer different knot positions, but a centered front edge and flat flap give each person a clear starting point. Do not assume that one level of tightness suits every wearer.
FAQ
How do you tie a doo rag step by step?
Place the front edge at your hairline, smooth the top and back flap, cross the two side ties behind your head, and knot them at the nape. Check that the covering stays in place without pulling your hairline.
Do you tie a doo rag flap into the knot?
No; on a doo rag with a separate back flap, lay the flap flat and cross the side ties over it. Tying the flap into the knot can bunch the fabric behind your head.
Where should a doo rag knot go?
The nape is the simplest starting position for a doo rag knot. Move it to the side if the center-back position is uncomfortable, then check that the front edge has not shifted.
How tight should a doo rag be?
A doo rag should stay in place without pulling at your hairline. If tightening causes pressure or shifts the front edge, loosen it and reposition the fabric.
Why does my doo rag keep slipping?
Check its front-edge placement, centering, flap position, and tie tension before tightening the knot. If it still slips when tied comfortably, reassess the fit of the covering.
Can you tie a doo rag over long hair?
Yes; arrange your hair beneath the covering before crossing the ties behind your head. Retie it if gathered hair lifts the top or pulls the front edge backward.
Is a doo rag tied like a bandana?
Not necessarily; the method here uses a doo rag with two attached ties and a separate flap. A square bandana needs folding before its corners can be tied.
One last thing
Before you add another knot, check the flap. A flap folded beneath the ties can make a doo rag feel loose at the front and bulky at the back at the same time. Flattening it and retieing with even tension is the better 2026 fix than pulling both ties harder.
Related guides
- Doo rags for gyms and fitness studios
- Best wholesale bandanas for nonprofit fundraisers
- Best neck gaiters for construction and outdoor work